|
There are several ways to look at
getting images ready for publication. Are we trying to show the
elements of a dense star cloud, or rich Milkyway field, or perhaps
a bright crimson red nebulosity to an advantage? The answer I
have come to the conclusion on is you can use one of two methods
to highlight your subjects.
For nebula, especially
faint tendrils in a rich star field, it is well known that applying
the "erosion filter" in Photoshop can enhance the visibility
of dim nebula by removing all the dim stars and reducing the
bright ones, but not affecting the nebula.
I am demonstrating the
opposite condition here, using the new software Pix Insight to
implement some dramatic changes in an image, to make it more
compatible with your intended output device, or for magazine
or book publication.
The Problem.
Images taken with fast
focal ratio instruments have very small stars. The smallest
size of the stars on film or CCD are directly proportional to
the f/ number, not the aperture or focal length (Assuming good
seeing) . A fast 50mm lens for example can produce stars about
the size of a living blood cell for example, about 5 microns.
A full size enlargement of this image up to 16x20 for example
will yield a tremendous number of faint stars, and of course
a highly detailed image. But if we reduce the size of the print
by the use of a now standard digital printer (like Walmarts new
digital photo printers) or resize for the internet to 640x480,
or even try to print the image at a paltry 5x7 size, we start
loosing all the faint stars. Why? If the original had stars that
when scanned or were originally digital that were only one or
two pixels across, they will resize to sub pixel' and effectively
disappear at any smaller sizes. Down below are two images Ill
explain a bit later to demonstrate this resampling problem.
One Solution.
Mathematically there
is one way to keep all those hard earned faint stars, and print,
or display on a web page everything you recorded. The latest
version of Pix Insight has a new dilation filter that you can
adjust the parameters on, unlike Photoshops one slider does all
approach. Here's the theory, If you increase the size of the
stars not by defocusing (which would blur them out and remove
them) by a round kernel dilation process, you effectively expand
the disk of the star, but don't change its brightness. So if
we are to make a image half sized in which the stars are about
one pixel to start with, you would double the star size by dilation,
then resize the picture to its final size. Then the stars would
be once again one pixel. Further reductions in size will require
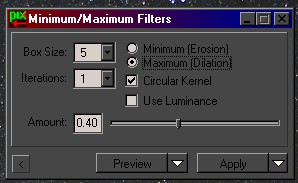
more dilation. I used a setting of about .4 pixels to get the
images below. Remember - use only JUST enough dilation to make
the faintest stars you want in the final picture become visible,
and NO more. You will love what it rescues from your original
hard earned images! Here are the settings used for this process:
Two Examples.
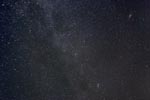
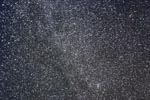
Look carefully at the
two thumbnails below. The top one is a shot of Cassiopeia with
a fast lens for 5 minutes at ASA 3200 from my backyard. Its more
vague glows and certainly one or two stars. The second image
has had dilation and SGBNR applied with Pix Insight. I over exaggerated
the dilation to make this thumbnail to prove a point - the faint
stars are there in the original, and you can make them more visible
in smaller sizes to any extent you wish with this process. Now
look at the 1200x800 images, and see faint stars in the second
image that are not even present in the first. Its hard to believe
that its not the same image!
Conclusion.
Here is yet another
tool for the modern astrophotographer to enhance their images
to their full potential. The key to most astrophotography is
to show off the final images in either print, internet, or magazine
publication (the ultimate). I hope you found this technique as
useful as it has been to me in getting the most out of my schmidt
camera and wide field film, and digital images !
|