
One of the most important considerations when designing a robotic system to operate autonomously in a home environment is how we are going to keep the robot operating for extended periods for it to perform its assigned task. This is can be accomplished by the use of a stationary battery recharging station located in a central or specific location within the home. In this article, we will delve deeply into the mechanics, electronics and programming processes to enable your robot to maintain itself operational nearly indefinitely, in a safe and highly successful manner.
Our generic robot
PICbot V in one of many test configurations
The primary workhorse of our research and docking development program is what we call "PICbot V". Consisting of a stripped commercially available small robot, we constructed on this base all of the mechanical and electronic systems for our research, changing and replacing components to suit the experiment in the docking process. Our modifications to the Boe Bot chassis included stripping off all electronics and battery holders, leaving only the chassis and servos. We then added to the basic chassis two proto boards, an LCD display and two battery packs to power additional systems. All processors for both the servo motor drive (RS232 serial interface) and the primary processor are Microchip PIC processors (12F629 & 16F876A), thus the "PICbot" designation. Considering the Basic Docking process
Now lets discuss the basic docking process itself in its simplest terms, so we can develop a foundation in your mind for the series of maneuvers the robot must perform to connect itself to its battery charger. For most household robots, their task can range from simply roaming and staying alive, to top end tasks such as floor maintenance, or watering the plants. At some point in their travels, the robot will run low on its battery reserves. At this point, most home robots essentially drop dead and cease to function. But if the robot is equipped to locate and dock with its battery charger, it can regenerate its reserves on its own, and after fully charged can resume its task. Lets go over the steps for our home robot to do this.
Step 1: Hunger
This is when the robot in the process of performing its task detects the battery is in a low condition. How is this accomplished? As a general guideline, when a 12v gel cell or NiMH battery pack reaches approximately 80 percent of its peak fully charged voltage, its time. For example, our PAAMI project, the robot had two 12v gel cells for electronics and motors. Each was monitored separately with a simple opamp window compartor circuit. When the voltage dropped below 11 volts, the robot would start hovering near the areas it expects the charger to be in but wont dock. At 80 percent power however on either battery which corresponds to about 10 volts for a fully charged 12.6 volt gel cell the robot will initiate the hunger subroutine and keep an eye out for the charge beacon. Step 2: Proximity travel/detection
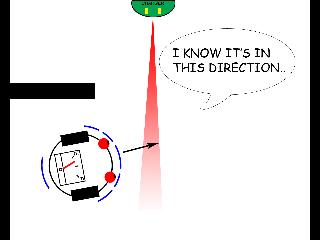
Once the robot determines its reserves are sufficiently low to seek the charger, the robot must do a wide angle search for its charger beacon. At this stage, we do not care exactly where it is, but merely if we are in its vicinity. This is "Proximity Detection" and lets the robot know it is within range of the charger.
Proximity detection sensors can see a full 360 degrees around the robot and sense the charger is within range. Some robots will at this point automatically travel to a known location where it will be in proximity of the beacon, then begin the proximity search. Others with a smaller range in a home environment such as limited to a single room or two, can simply roam around until the proximity detection sensor becomes active. The bottom line is to let the robot know when its is physically near the charging station with an imprecise but very wide angle search routine. Step 3: Precision aiming
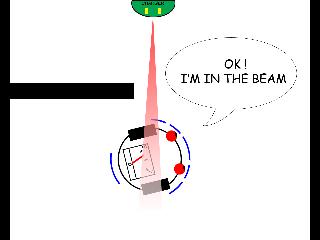
When the robot has determined that is is near the charger beacon with its wide angle sensors, it next must use its fine guidance sensors to point directly at the charger beacon/pattern. This can be accomplished with a wide range of technologies but the concept is to point the robot in the general direction. Normally, the precision aiming sensor has only a very narrow detection radius, and is used primarily to get an accurate bearing on the nearby charger. Step 4: Travel to beacon
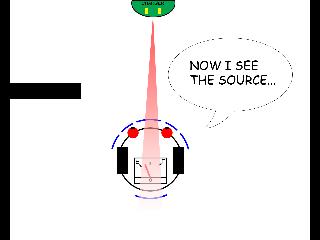
Once pointed approximately at the beacon on the charger, it can drive straight to it. We will know at this point that the path will be fairly short because we are within the proximity detection sensors range (about 10 feet or less) and the trip will be short. The precision aiming sensor is used to guide the robot to the charger. A typical travel pattern is a gentle "S" shaped path to the beacon. More on this later.
Step 5: Connect to contacts
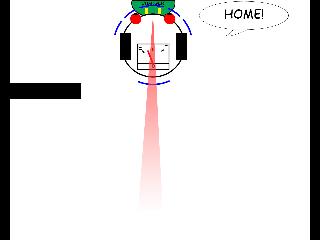
The trickiest part of docking will be engaging with the contact assembly on the charger. This is where the greatest chance of failure will occur in the entire docking process. Here, the robot drives into, or onto the docking assembly and should connect to the electrical contacts on the base. The robot must KNOW for certain it is connected to the base. Looking for the charging voltage is usually sufficent, however additional clues such as contact switch closures can be used effectively. Step 6: Shutdown/Charge
The final step in the charging process is to stop the robot when it detects it is properly seated on the charger contacts, and shut down most of its systems to put a minimal draw on the batteries during the charging process. The battery is monitored during the charging time, and when fully recharged, the process terminates with the robot escaping the charger and continuing on with its task. Obviously some part of the processing circuitry must remain on and active during the charging process to monitor it. For the most part, turning off all indicator lights (except maybe one charging indicator) and not activating the drive motors is sufficient. Step 7: Charger Escape
The robot then performs a ballistic maneuver (preprogrammed no sensory input) to escape the charger. Normally this entails backing off, turning away from the charger and driving away from it. Since the area around a charger should be kept clear of all obstacles, this is normally an uneventful process. The robot must then return to its task it was performing before docking. This may require the robot to know where it is and travel a distance to the task. The charger then serves another very important function - it is a positional reference that does not change to zero out the robots orientation.